If you are new to print design, you may encounter some terms that are unfamiliar or confusing. These terms are important to understand because they affect how your design will look after printing. In this article, we will explain three essential print design terms:
- Safe Zone
- Trim Area
- Bleed Lines
Contents
How to Use Safe Zone, Trim Line, and Bleed Area in Your Print Design
Before you start designing your print project, you need to know how to use the safe zone, trim line, and bleed area correctly. These terms will help you create a design that fits the final size and shape of your print project and avoids any unwanted white spaces or cropped content. In this article, we will explain what each term means, why it is important, and how to apply it in your design software.
Read More: How to Prepare Your Design for Printing?
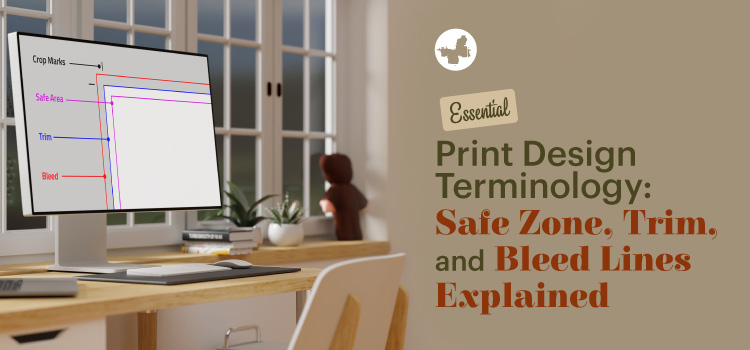
What Is the Safe Zone?
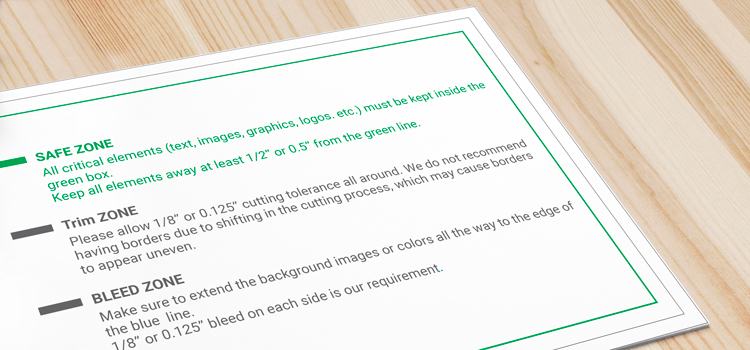
The safe zone is the area inside the trim line where you should place your most important information and graphics. We also call it the margin or the inset. It can also account for the gutter, or middle, of the publication and how easy it will be to see content in the centre of a magazine spread.
The size of the safe zone depends on the type and size of your print project. For example, a business card may have a safe zone of 0.125 inches (3 mm) from the edge, while a poster may have a safe zone of 0.5 inches (12 mm) from the edge. You can check the specifications of your printer or online printing service for the exact measurements of the safe zone for your project.
To create a safe zone in your design software, you can use guides, rulers, or grids to mark the boundaries of the safe zone. You can also use templates that already have the safe zone marked for you. Make sure that all your text, logos, images, and other elements are within the safe zone and do not touch or cross the trim line.
What Is the Trim Line?
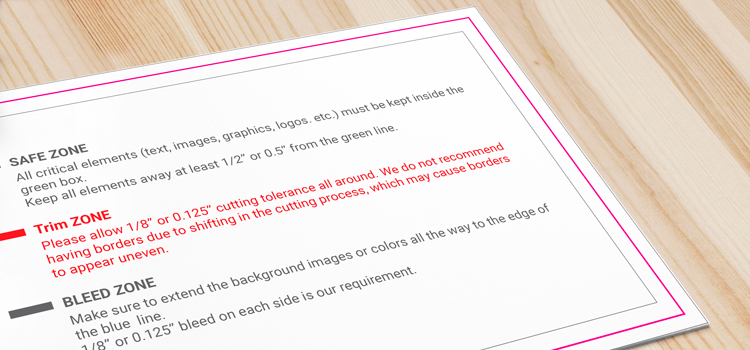
The trim line is the line where the printer will cut the paper to the final size of your print project. We also call it the cut line or the crop mark. It shows you the exact dimensions of your print project after it is trimmed.
The trim line is usually marked by thin black lines in the corners of your design. These lines are called crop marks and they indicate where the paper should be cut. The crop marks are not part of your design and they will not be printed on your final product.
The trim line is not always precise and accurate. Sometimes, there may be slight variations or shifts in the cutting process due to human or machine errors. This means that the paper may be cut slightly inside or outside the trim line. This is why you need to have a bleed area and a safe zone in your design to avoid any unwanted white spaces or cropped content.
What Is the Bleed Area?
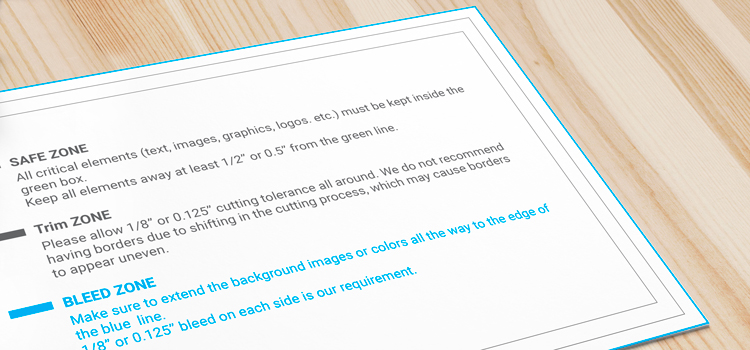
The bleed area is the area outside the trim line where you should extend your background graphics and colours. We also call the bleed area the bleed margin or simply bleed. It ensures that your design will cover the entire edge of your paper without leaving any white spaces after trimming.
The size of the bleed area depends on the type and size of your print project as well as the printer’s specifications. For example, a standard bleed size for printing might be 0.125 inches (3 mm) from each edge, but some printers may require more or less bleed. You can check with your printer or online printing service for their recommended bleed size for your project.
To create a bleed area in your design software, you can use guides, rulers, or grids to mark the boundaries of the bleed area. You can also use templates that already have the bleed area marked for you. Ensure all background graphics and colours extend beyond the trim line into the bleed area
How Much Bleed Area Should I Leave For Printing?
The amount of bleed you should leave for printing depends on several factors, such as:
- The type and size of your print project
- The printer’s specifications and requirements
- The quality and accuracy of the cutting process
- The margin of error you are willing to accept
Leave at least 0.125 inches (3 mm) of bleed on each edge of your print project. This is enough to cover most variations and shifts in the cutting process. However, some printers may require more or less bleed depending on their equipment and standards. For example, some large-format printers may require up to 0.5 inches (12 mm) of bleed for posters or banners.
You can check with your printer or online printing service for the recommended amount of bleed for your project.
Conclusion
Here are some key points to remember:
- A safe zone is the area inside the trim line where you should place your most important information and graphics.
- The trim line marks where the printer will cut the paper to your project’s final size.
- A bleed area is an area outside the trim line where you should extend your background graphics and colours.
- Leave at least 0.125 inches (3 mm) of bleed from each edge, or more based on your printer’s specifications.
Safe zone, trim line, and bleed area are essential terms for print design. Following these guidelines ensures your design looks professional and flawless in print.